New controls available to block automatic email forwarding!

One of the most common methods for an adversary attempting to keep a foothold on your Office 365 tenant (if they get access) is to setup some email forwarding. Doing this means that even if they are kicked out of their target account/s, they still have data flowing to an external mailbox, and this data can be used for reconnaissance and exfiltration of data.

It’s really simple to set forwarding through Powershell (using Set-Mailbox, even the end user can do this!) or through the graphical interface. Until now (July 2020) it was actually a bit overcomplicated to stop autoforwarding from happening, involving a few different configuration options, but thankfully the product group at Microsoft have simplified this by adding a single option to rule them all.

This wonderful new option is located in the Outbound spam filter policy at https://protection.office.com

It can also be managed using Powershell:

Set-HostedOutboundSpamFilterPolicy -Identity 'Default' -AutoForwardingMode Off

Options for this cmdlet are ‘Off’, ‘On’, and ‘Automatic’. On and off are quite clear but the Automatic option allows Microsoft to control the setting, and this is to help with the rollout. All tenants will be set to Automatic mode for starters, and then this automatic setting will turn forwarding on or off based on whether any auto forwarding was detected in your environment recently.

This feature is currently available to my Targeted Release tenant but may not be fully rolled out until August 2020. Initially it may not actually block forwarding (until the rollout is complete) so it’s worth keeping your existing policies in place for the moment.

If you don’t want to block forwarding but want to keep an eye on it’s use, I’d recommend you review this article about the Forwarding Report capability in the Security & Compliance portal.

Using a gMSA account with AADConnect

If you haven’t heard of a gMSA, you haven’t lived. That’s what my Mum tells me anyway.

A gMSA is also known as a Group Managed Service Account, and it really is the future of Service Accounts. It doesn’t allow interactive logons, it recycles it’s credentials automatically and can also be tied down so it can only be used on specific hosts. Most importantly it is recommended if you use Azure AD Connect with a dedicated SQL Server.

It does require Server 2012 or above on your domain controllers (for the schema extensions) and an Azure AD Connect server, but if you aren’t using this OS or newer yet, then I think you have other priorities you need to address 🙂

So the big question is; how do we use this magical feature? The guide below is for a new installation of AADConnect.

Firstly, if you haven’t done so already you need to enable the KDS Root Key 🔐 required for generating the passwords used by the service account. Run this PS Command from an AD Powershell prompt to enable the KDS Root Key 🔐. This can be done from a Domain Controller or from a server running RSAT ADDS tools.

Add-KdsRootKey –EffectiveImmediately

Funnily enough, even though we used -EffectiveImmediately, it is only available instantly on the DC you ran the command from. The other DC’s need to wait for replication to complete for the key to be available.

You then need to create the AAD Connect gMSA service account. Use this PS command to do this:

New-ADServiceAccount -Name AADC-gMSA -Description "AAD Connect Service Account" -DNSHostName aadc.Contoso.com -PrincipalsAllowedToRetrieveManagedPassword MGMT01$,MGMT01$ -Passthru

Replace the sections in red with your own information. MGMT01 and MGMT02 are the names of our primary and staging AAD Connect servers in this instance, and the DNSHostName parameter essentially sets a DNS name of the service we are running.

Once this is done, you need to head over to your AAD Connect server and add the account using:

Install-ADServiceAccount AADC-gMSA

Lastly, during AADConnect installation, we need to select the service account. During initial installation, choose the ‘Customise’ option as shown below:

Screenshot 2019-05-21 at 16.55.44

And then select ‘Use an existing service account’ and enter the service account name using the domain\accountname$ format.

Screenshot 2019-05-21 at 16.57.43

This process will help you automate and secure your service accounts in the future, and is a great choice whenever a service account is required and gMSA is supported.


Use PowerShell to report on Azure AD Enterprise Application Permissions

Many Microsoft customers are now taking steps to try and modernise and centralise SaaS app identity by using Enterprise Applications within Azure AD to provide authentication, provisioning and reporting services.

This can be done by Administrators by adding applications into the AzureAD tenant and assigning users to them, or by Users (if you let them) who can self-service applications (think the Log in with Facebook / Google buttons). Applications which are added will have certain permissions assigned which will allow said application to be able to access AzureAD properties via the Microsoft Graph API.

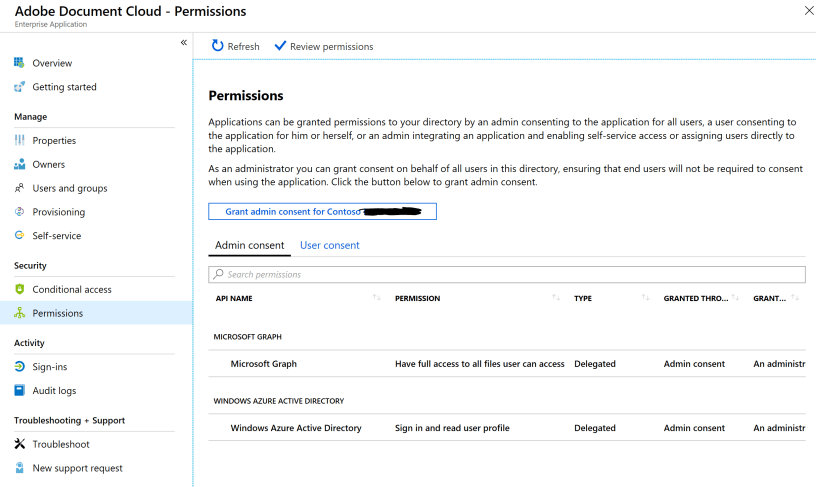
These permissions can be as simple as allowing the application to read the users displayname, all the way to having full access to all files which the user can access in Office 365. You can see these permissions in the GUI by logging onto portal.azure.com and navigating to Azure Active Directory>Enterprise Applications>Application Name>Permissions, as seen in the screenshot below. We can see that the Adobe Document Cloud application has had Admin consent to have full access to all files the user can access, and to sign in and read user profile. You can see the full range of available permissions in the Microsoft Graph, and what they all mean here.

perms

This GUI feature is great for looking at individual applications, but if you are allowing users to provide consent themselves, or you are making full use of the Enterprise Applications feature, you are likely to have many applications listed here, and checking them one by one using the GUI is not efficient.

As always, PowerShell is able to come to the rescue. If we connect to the AzureAD v2 Powershell module by using Connect-AzureAD, we can export these permissions. Unfortunately, because of the way the data is presented, we need to do a little data massaging to make this possible.

Firstly, we need to get a list of all applications, and this can be done using:

Get-AzureADServicePrincipal | Select DisplayName,Homepage,ObjectID,AppDisplayName,PublisherName,
ServicePrincipalType | Export-Csv c:\reports\azureadsp.csv

This PS command will get a list of all the Service Principals (read: applications) you have configured, however it will not list the permissions. We need another cmdlet for that. The item we are most interested in for the Service Principal is the ObjectID, as this is the value we can use to map the Service Principal to the Permissions.

The next PS command we need is:

Get-AzureADOAuth2PermissionGrant | Select ClientID,Scope,ConsentType | Export-CSV :\oaauthperms.csv

This PS command will get a list of all the permissions granted in AzureAD. The important value here is the ClientID, which refers to the application, and the Scope, which refers to the permission level as described in the Graph Permissions article.

With this data we have two .csv files, and we need to compare the ObjectID from azureadsp.csv with the ClientID from oauthperms.csv. If we find a match, we need to copy the Now I’m no Excel expert, and there are probably better ways of doing this, but this was my method.

I copied the columns from azureadsp.csv into the oauthperms.csv. Let’s say the ObjectID value from azureadsp.csv ended up on row J. I would then create a new column called Application Name, at column A. I then used the INDEX, MATCH formula to look for identical ObjectID and ClientID values, and if a match was found, populate the Application Name.

indexmatch

The formula used looks like this:

=INDEX($H$2:$H$101,MATCH($B2,$J$2:$J$101,0))

Substituting the column names for logical names looks like this:

=INDEX($DisplayName$2:$DisplayName$101,MATCH($ClientID2,$ObjectID$2:$ObjectID$101,0))

This gives us a value in Application Name which shows us the application which has been given rights to the Microsoft Graph and can enable us to easily see and filter which permissions have been given to which application. This can be used for management purposes, reporting and security auditing.

Hopefully this is useful for you, and if you think this could be improved upon please let me know in the comments!

Report Email Traffic By The Hour

It’s a well known fact that reporting is the sexiest topic in IT. To that end, I thought I’d post a quick one liner about email flow reporting in your organisation. This came about following a request from one of my favourite customers, who needed a way to report on how much email was being sent and received out of hours.

Get-MailTrafficReport -StartDate 01/14/2018 -EndDate 01/22/2018 -AggregateBy Hour -EventType GoodMail | select Date,Direction,MessageCount | Export-csv C:\users\emily\Desktop\mailflowreport.csv

This PS command is run in Exchange Online Powershell and will result in a CSV which shows an hourly breakdown of email sent / received in a given time period. It’s possible to add specific times to the dates (eg “01/14/2018 05:00”). I used the -EventType GoodMail variable to only report on Accepted mail in this example. You can also filter on -Direction (Inbound or Outbound). Below is a snapshot of the results:

Date Event Type Direction Action Message Count
------ ---- ---------- --------- ------ -------------
 15/01/2018 14:00:00 GoodMail Inbound 430
 15/01/2018 15:00:00 GoodMail Inbound 230
 15/01/2018 16:00:00 GoodMail Inbound 187
 15/01/2018 18:00:00 GoodMail Inbound 57
 15/01/2018 18:00:00 GoodMail Outbound 124
 15/01/2018 19:00:00 GoodMail Inbound 34
 15/01/2018 19:00:00 GoodMail Outbound 87

The TechNet article on the Get-MailTrafficReport cmdlet is here

This is a very versatile reporting function which can yield interesting data. This data can then be fed into PowerBI or a.n.other reporting tool to add some visual showmanship to the results!

Post offering a free Recreational Vehicle!

Social Engineering and your users

All my customers want to talk about security these days. So much of our day to day work is done on the internet now, and the security landscape has changed significantly over the last 5-10 years. Our perimeter is no longer restricted to our LAN and firewalls, but instead lives with the users identity. Users are highly likely to use their corporate network password on other sites; who knows whether this other site has been breached or not?

Things like this scare us IT admins, and even scarier now is the gargantuan amount of misinformation and misdirection on the internet. From that advert that looks like a “next page “button to the link to an article which promises to show you the most amazing thing you’ve ever seen a koala do, users will literally click on anything. Today I want to share one of these examples. I noticed this morning that a friend of mine had shared this post on Facebook:

Post offering a free Recreational Vehicle!

Wow! A free RV. Amazing right? But this post looked a little strange. Who can afford to give away an RV, let alone 15 of them? And what did “can’t be sold because they have been stock this year” mean? My curiosity got the better of me and I decided to click through. This is what I found:

RV Main Page

Now let me give you a few facts:

  • This page only had a single post. This one.
  • It has 83,045 shares and 35,015 comments. In 3 days. Both of these numbers have gone up by around 1,000 while I have been writing this.
  • The page had nothing in the about section. No website, no contact details, nothing. Nada. Zip. It was basically an empty page with one post on it.

This was clearly a ruse and nobody was going to get themselves a free RV. I mean hey, maybe I’m wrong and an awful cynic who has been scarred by the internet. But in reality, this was a more than likely a social engineering experiment or phishing scam. Maybe the “lucky winners” would be contacted and asked for some personal details so that they could claim their free prize? Maybe they were directed to a fake Facebook login page? And maybe their Facebook login password was the same as their corporate network password?

This post shows us all just how easy it is to get people to click on something, or believe something, on the internet. And this stuff is everywhere we look. As an internet user, we are faced with a constant stream of misinformation and misdirection, never quite knowing when something is real and when it isn’t.

Security has never been more important. Using web filtering, multi factor authentication and implementing features for mail scanning like Safe Links and Safe Attachments (found in Exchange Online Protection) can help to a certain degree,  but a very large part of this fight is user education. People should be taught that their first response should be one of doubt, not of excitement about the amazing thing they are about to see, or the prize they will never win.

It’s a dangerous world we live in. But at least I’ll have a new RV to protect myself.

Exchange 2016 on Server 2016 – A reboot from a previous installation is pending

Recently I was attempting to install Exchange 2016 on Server 2016. On attempting to run the setup.exe /preparealldomains /iacceptexchangeserverlicenseterms command, I was receiving a failure when checking prerequisites which stated that:

PS E:\> .\Setup.EXE /preparealldomains /iacceptexchangeserverlicenseterms

Performing Microsoft Exchange Server Prerequisite Check

Prerequisite Analysis FAILED

A reboot from a previous installation is pending. Please restart the system and then rerun Setup.
For more information, visit: http://technet.microsoft.com/library(EXCHG.150)/ms.exch.setupreadiness.RebootPending.asp

I had rebooted the server a few times and ensured that no restarts were pending.

In versions of Server prior to Server 2016, I would be looking for the UpdateExeVolatile registry key and the PendingFileRenameOperations registry key under HKEY Local Machine. However these didn’t appear to be in their normal place. Eventually I did a search of the Registry and discovered that PendingFileRenameOperations has moved to:

HKLM\System\ControlSet001\Control\Session Manager\PendingFileRenameOperations

The previous location of this key was:

HKLM\System\CurrentControlSet\Control\Session Manager\PendingFileRenameOperations

Removing the entries in PendingFileRenameOperations resolved the problem in this case.


VNET Peering – When to use and when not to use

VNET Peering has been an available feature for almost a year now and has proved to be a very useful, popular, and for a long time the most requested feature. That said, as much as we would like to mesh together all our Azure VNETs into one lovely firewalled network topology, this isn’t always possible or suitable.

The situations whereby VNET peering (or it’s associated features) cannot be used are as follows:

  • VNETs in different regions cannot have a peering relationship
  • VNETs with overlapping address spaces cannot be peered
  • VNETs which are both created using the Classic Deployment model cannot be peered
  • VNETs which are created using mixed deployment models cannot be peered across different subscriptions (although this will be available in the future)
  • Both VNETs must be created using the Resource Manager Deployment Model for Gateway Chaining (using a gateway in a peered VNET) to function
  • There is a default limit of 10 VNET peers per VNET. This can be raised to a maximum of 50 using Azure Support requests

This still leaves many applicable situations whereby VNET peering can be very useful and can provide the hub and spoke, high speed, low latency network which your Azure subscription/s need.


ADFS Additional Authentication Rules – MFA Issue Type

ADFS Claim / Additional Authentication rules can appear very complex and confusing, and that’s because they are! One thing that tripped me up recently is related to the issue section of a claim rule whereby MFA is specified. During a project, I created a rule from a template I had used for another customer. Upon saving the rule I found that it didn’t apply MFA as I was expecting, and instead caused an error message in ADFS during logon attempts.

The rule I had used was issuing a claim for the Azure MFA Server rather than the Azure MFA Cloud Service. To clarify, the difference in the claim type is as follows:

Azure Cloud MFA

=> issue(Type = "http://schemas.microsoft.com/claims/authnmethodsreferences", Value = "http://schemas.microsoft.com/claims/multipleauthn");

Azure MFA Server

=> issue(Type = "http://schemas.microsoft.com/ws/2008/06/identity/claims/authenticationmethod", Value = "http://schemas.microsoft.com/claims/multipleauthn");


This is an important distinction and needs to be considered when applying different types of authentication flows in ADFS.


Virtual Machine Core Count – Azure

Today is not the first time I have come across this issue, but I’m going to make sure it’s the last time I google how to find out the limits applied to an Azure subscription!

By default, different VM soft limits apply to different types of subscriptions. If you come across this issue, your error will look something like this:

New-AzureRmVM : Operation results in exceeding quota limits of Core. Maximum allowed: 10, Current in use: 10

From memory (this may not be correct), the limits are as follows for different subscription types:

  • Pay as you go – 10 cores per VM type / region
  • CSP – 30 cores per VM type / region
  • VL – 20 cores per VM type / region
  • EA – I’m not sure!

If you want to see how many cores you are allowed by default, you need to login to Azure Powershell and run the following command, substituting your region.

Get-AzureRMVMUsage -Location "West Europe"

This will give you an output similar to below:

PS C:\WINDOWS\system32> Get-AzureRmVMUsage -Location "West Europe"

Name                         Current Value Limit  Unit
----                         ------------- -----  ----
Availability Sets                        3  2000 Count
Total Regional Cores                    10    10 Count
Virtual Machines                         8 10000 Count
Virtual Machine Scale Sets               0  2000 Count
Standard Av2 Family Cores               10    10 Count
Basic A Family Cores                     0    10 Count
Standard A0-A7 Family Cores              0    10 Count
Standard A8-A11 Family Cores             0    10 Count
Standard D Family Cores                  0    10 Count
Standard Dv2 Family Cores                0    10 Count
Standard G Family Cores                  0    10 Count
Standard DS Family Cores                 0    10 Count
Standard DSv2 Family Cores               0    10 Count
Standard GS Family Cores                 0    10 Count
Standard F Family Cores                  0    10 Count
Standard FS Family Cores                 0    10 Count
Standard NV Family Cores                 0    12 Count
Standard NC Family Cores                 0    12 Count
Standard H Family Cores                  0     8 Count
Standard LS Family Cores                 0    10 Count
As you can see, for each region there is a subset of machine types. If you need to raise a core limit, you need to raise an Azure support ticket and request an increase for the required region and VM type. This does not cost anything and from my experience is usually done within 24 hours.
Hopefully this helps some folk out there who come across this issue. If you haven’t seen this yet and are planning an Azure rollout, it would be worth requesting this increase prior to starting your project!

Azure AD Powershell – Token Lifetime Configuration for MFA

The default token expiry in Azure AD for ADAL clients (using Modern Authentication) is 14 days for single factor and multi factor authentication users. This can stretch up to 90 days as long as the user does not change their password, and they do not go offline for longer than 14 days.

This means that clients using Outlook or Skype for Business can perform MFA once and then remain signed in using their access token for up to 90 days before being required to authenticate using MFA. As you can imagine, this is not an ideal situation for multi-factor authentication as a compromised account could be accessed through a rich client application with no MFA for up to 90 days.

Until recently, this could not be modified. However Microsoft released Configurable Token Lifetime as a Preview feature quite recently. This allows for various properties to be controlled, giving administrators more granular control over token refresh and enforcing a more secure MFA policy.

The Azure team have provided a solid guide here: https://docs.microsoft.com/en-us/azure/active-directory/active-directory-configurable-token-lifetimes

To do this, you need the Azure AD Preview PowerShell module. Install this by running the following from a PowerShell prompt:

Install-Module -Name AzureADPreview 

Here is a sample policy I’ve configured which will change the MFA token lifetime to 12 hours. I’ve combined this with ADFS Claim Rules which only enforce MFA if the user is on the extranet and using particular applications:

New-AzureADPolicy -Definition @("{`"TokenLifetimePolicy`":{`"Version`":1, `"MaxAgeMultiFactor`":`"12:00:00`",`"AccessTokenLifetime`":`"04:00:00`"}}") -DisplayName OrganizationDefaultPolicyScenario -IsOrganizationDefault $true -Type TokenLifetimePolicy

This is  a much needed feature from the point of view of security controls, although keep in mind it is still in Preview!